Vintage Cabinetry Restorations
As a long-time musician, I’ve seen and used many very old and collectable pieces of musical equipment. The stresses of years of use on the road have taken their toll on a lot of that old gear, and I find it most fulfilling to restore the cabinetry of those great amps back to their previous glory.
Wherever possible, to maintain originality and value of a vintage piece, I strongly recommend not re-covering it. A meticulous cleaning is sometimes all that’s required to bring it back to life. If any tolex patchwork is required, I can usually find a perfect match from my large selection of salvaged original vintage tolexes and grill cloths., including Marshall, Vox, HiWatt, Orange, Ampeg, Fender, Garnet, Traynor, and many more.
If complete restoration is required, most brands, types and colours of tolexes, grille cloths, handles, corners, and other hardware are currently available.
From there, it’s my job to ensure that your prized possession is re-done as accurately and perfectly as the original.
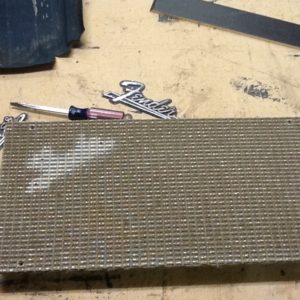
Hardware: Restoration requires that all components and hardware be removed from the cabinet. Unless badly damaged, as much of the original hardware as possible should be re-used. Any hardware from any collectable piece that gets replaced should be kept as parts of the original cabinet and passed along with the cabinet in the event it is ever sold. For cabinets with rivets attaching the hardware, it’s best to use new rivets for re-installation.
Over the years, I have accumulated a number of original vintage pieces of hardware (logos, handles, corners, jacks, screws, etc) so replacing your missing part with the real thing is entirely a possibility. In a few extreme cases, it has been necessary to manufacture a piece where the replacement part was no longer available.
Stripping: Once the old tolex has been removed, all of the original glue must be completely stripped off. The surface must be completely smooth.
Structural Repairs: Any broken or missing wood must be repaired or replaced. Dents, scrapes and screw and rivet holes are filled and sanded. All glue bonds are checked and re-glued if necessary. Damaged or missing speaker mounting hardware must be replaced. The interior receives a thorough cleaning and, if necessary, is re-painted or re-stained, with care taken to not damage any tube charts or other labels inside the cabinet.
Tolex: There are dozens of colours and textures of tolex. As well, there are varying versions of original vintage tolexes available, and their prices generally reflect the quality and accuracy of their reproduction. Because none of these are made in Canada, international shipping costs add to the cost of the materials, and shipments can take 2 to 3 weeks to arrive here.
Grill Cloth: If the amp spent its’ early years performing in clubs, the grille cloth is likely yellowed and dirty from nicotine, smoke, spilled drinks, and dust. The cloth is undamaged, it can be carefully removed and cleaned. If it is damaged and in need of replacement, most styles are available (from mainly US sources). If the panel holding the grille cloth is damaged, a replacement needs to be made.
Piping: Unless the piping has been damaged, it can usually be cleaned and re-used. Even if there is minor damage, I would recommend re-using it to maintain originality.
LATEST PROJECTS:
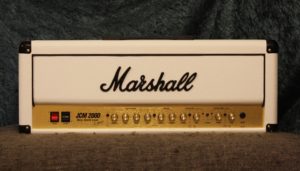
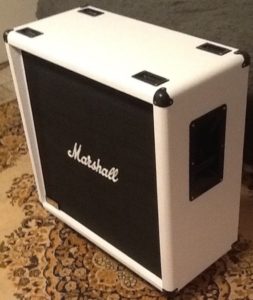
Marshall JCM 2000 – black to white conversion
This project happened in 3 parts, ending up with a Marshall stack reminiscent of Randy Rhodes’ rig. My client had a vision. He slowly found the parts he needed and I re-covered them, one at a time. All 3 components in the stack started out in standard black. I think you’ll agree that the new appearance is very eye-catching.


RESTORATIONS:
Early ’60’s 55-T United amplifier
This early 1960’s 55-T amplifier was sold under the brand names “United” and Keil” by Kitchener Electronics in Ontario.
Although this was more of an upgrade than a restoration, it did involve one of the oldest amps I’ve worked on. The owner chose this as his harmonica amp, but it came with only one 8″ speaker. He wanted more speaker cone area to achieve a bigger sound. The large open area in the back (where you can see the 8″ speaker) is where the amp head used to live.

After trying numerous speakers, we both agreed that a combination of 2 different Eminence 10″ speakers (a Ragin’ Cajun and a Li’l Buddy) gave him what he wanted. As one is brighter and the other is bigger sounding, giving a nice balance. Moving a microphone more to one or the other subtly changes the tone fed to the sound system. The new cabinet houses the original amp head and the speakers. The top front panel and both of the removable rear panels are solid walnut, and my new ambigram MINE logo is laser etched into the wood. The covering is burgundy snakeskin and the grille cloth is vintage Marshall “salt & pepper” with burgundy piping around it. We are very happy with the end result.


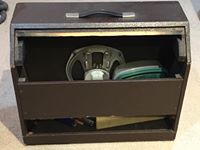
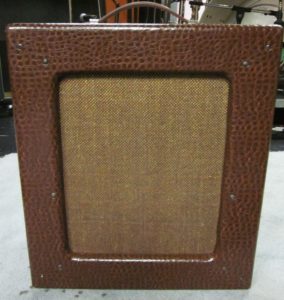
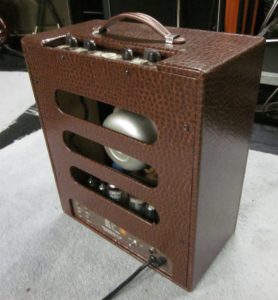
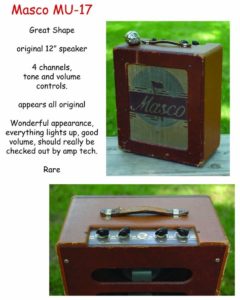
1958 Masco MU-17 Amplifier
This amp is also owned by a harp player, and was in rough shape when it came to me. A thorough stripping and cleaning were done before putting on its’ new ostrich skin tolex coat and vintage grille cloth. The original back panel was broken and needed to be replaced.
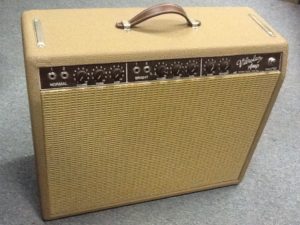
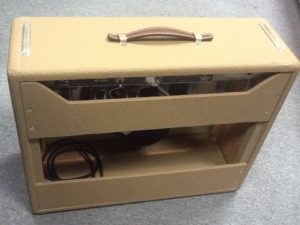
1962 Fender Vibrolux
This 1962 Fender Vibrolux amplifier had been cut in half to convert it to being just an amp head. The original brown tolex had been painted black. Its’ new owner wanted it returned to original specs and I was excited to get the call to do the job. The original tolex had to be stripped off and all of the glue removed from the pine cabinetry. The side panels then had to be extended and the original bottom panel reinstalled. It was retolexed and had new grille cloth installed on a new grille cloth frame. Due to the unreliable looking condition of the original handle, a new vintage remake leather handle was installed. The end result: a very sweet sounding 55 year-old Vibrolux that looks like new again.
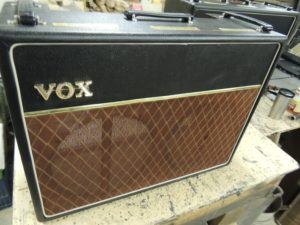
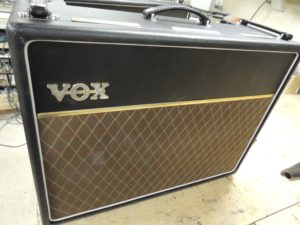
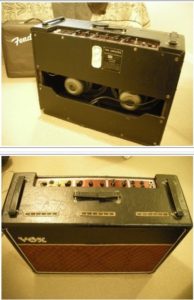
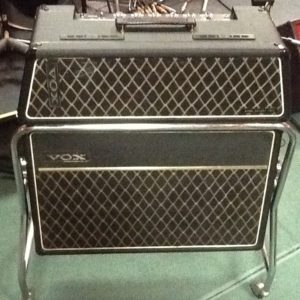
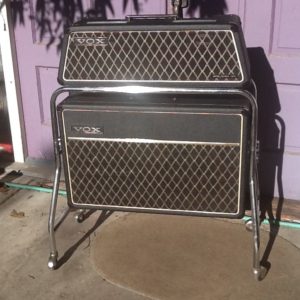
1962 Vox AC-30 Amplifiers
These 2 Vox AC-30’s, by chance, came to me at the same time (which gave me some great insight into early Vox amps). One was an early 1962 and it needed a complete restoration. The covering was a rare one made by a now-defunct company in England. The other amp, a later 1962 version had a different, equally rare covering. It was an extended effort to find appropriate covering that was close to the original, but eventually, a covering was found that both clients agreed was acceptable.
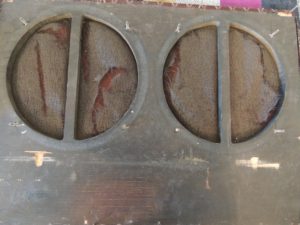
On further examination of the two units, I discovered that one cabinet was made from 3/4″ baltic birch and the other from 5/8″. The original grille cloth on one was tattered and torn, and needed to be replaced, as did the almost-impossible-to-find webbing that was underneath it (see 4th picture). The other (the one on the left) wasn’t torn, but as you can see, the cloth was greatly discoloured after years in smoky bars!!
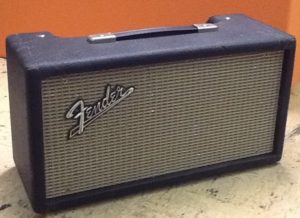
1965 Fender Reverb Unit
This Reverb wasn’t in terrible shape, but it was very dirty, inside and out. As well, moisture had lifted the tolex in a few places (middle picture), but none of it was torn. Careful removal of the tolex and proper cleaning of the wood beneath it allowed it to be reattached. The grille cloth was very dirty, as can be seen where the logo had kept it clean. Careful cleaning brought the cloth back to almost new looking again. Burnishing of all the original metal parts gave this Reverb Unit the finishing touches needed without compromising the originality of this almost perfect specimen.
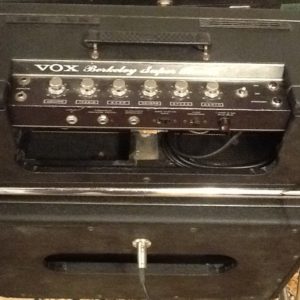
1965 Vox Berkeley Super Reverb
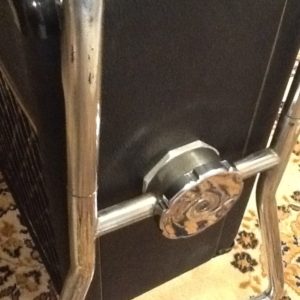
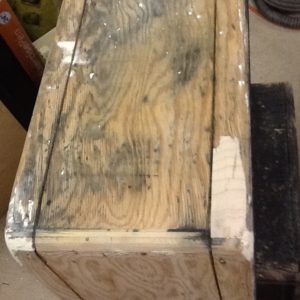
This amp came to me needing new tolex and a few hard-to-find parts. The logo on the amp head needed to be repaired. A number of parts on the cabinet-to-stand mounting swivel joints were missing. Original-style gaskets were available for the mounts, but the metal parts required had to be fabricated. The bottom panel of the speaker cabinet had been quite wet for an extended period, causing the plywood to delaminate in places.. The separations were glued and clamped, and where wood was actually missing, patches were applied, as can be seen in the last picture. The darker areas in that picture show the water staining. The amp was originally supplied with XLR speaker connections, which had been bypassed, likely due to the failure or loss of the speaker cable. The XLR connections were returned to function again and a new speaker cable was made.
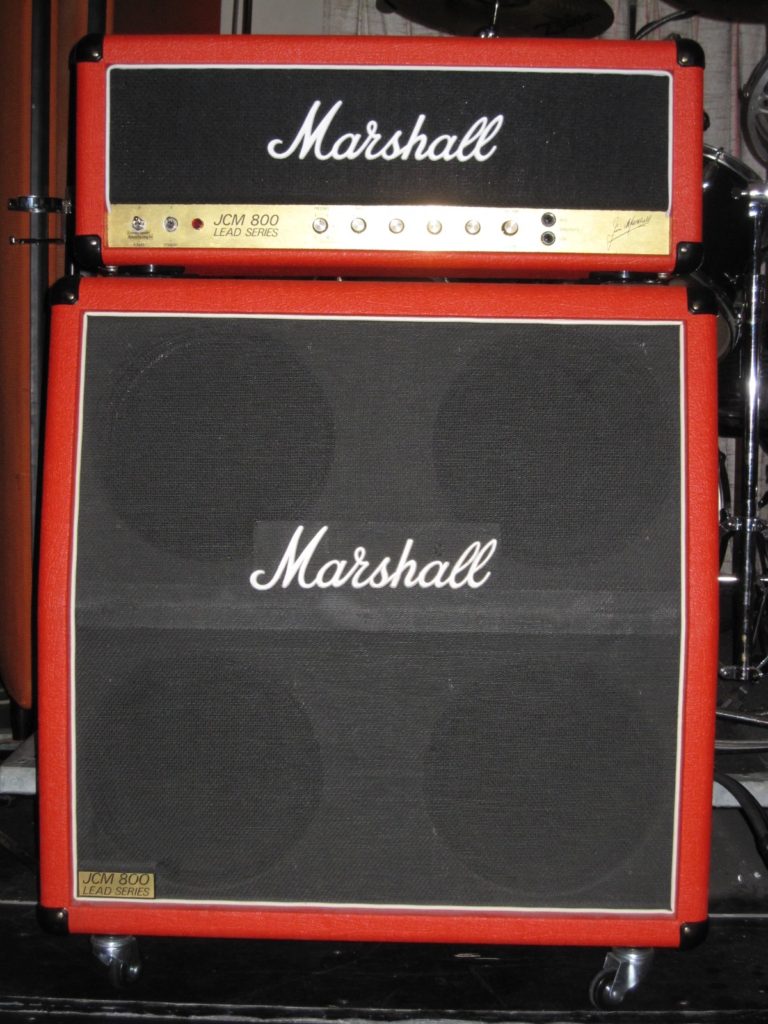
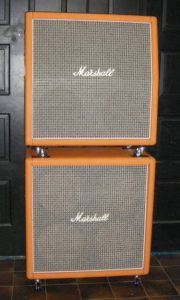
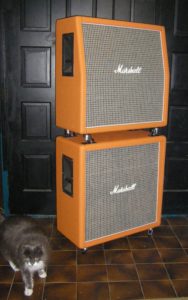
1970 Marshall 1960A and 1960B Speaker Cabinets
A client came to me with a beat up black 1970 Marshall 1960A top cabinet. By chance, I owned a mate for it – a 1970 bottom cabinet, albeit, also in pretty rough condition. He decided to buy it from me and have me re-tolex both cabinets to match his a 1973 Marshall JMP 100w Super Lead head that came originally in orange tolex. As you can see, both cabinets look very fine in the new finish with vintage correct “large check” grille cloth.
Jim Marshall had his cabinet makers sign the inside of each cabinet they built. The top cabinet had Jim’s signature in it. These were the very first of my cabinet restorations, and, as a novice in terms of taking all the right pictures, I kick myself for never getting a picture of that autograph!! Still, it was an honour to work on a piece built by the master himself!!
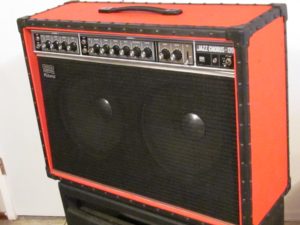
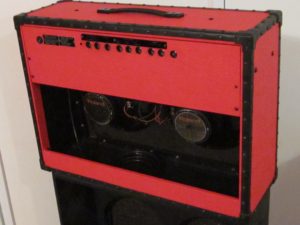
1978 Roland JC-120 Jazz Chorus
This mid-70’s Roland Jazz chorus was part of a much bigger plan. My client bought this amp, which was black, and he wanted it to match a brand new red Fender Rhodes Piano he had bought for his girlfriend. His plan: Give them to her for Christmas, and, at the same time, propose to her. She loved her presents, and she obviously loved him because she said YES.
The amplifier needed a new back panel to replace the original one which was badly warped and broken. New red tolex replaced the original black, and all of the original edging was re-attached. The speaker cones and the cabinet interior were cleaned and the damaged grille cloth was replaced with black.
The picture of the back is more representative of the red colour. Not sure why the other is so orange. They were taken on the same day, in the same position and with the same lighting. I’m a cabinet builder, not a photographer!!
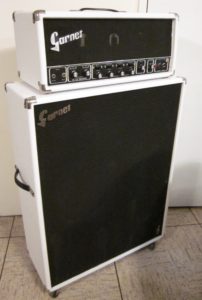
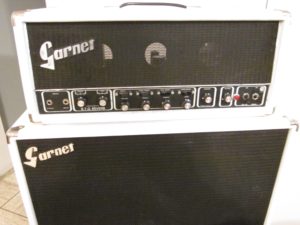
1972 Garnet BTO Reverb
This Winnipeg-made piece of Canadian music history was originally all black. The covering was replaced with white levant tolex and the original grille cloth was cleaned. The interiors of both the amp head and the speaker cabinet were cleaned. All of the metal hardware was cleaned and burnished.
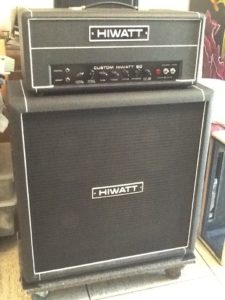
1975 HiWatt 50 watt amp head
This amp head cabinet had seen many years in smoky bars. The top panel had over 50 cigarette burns right through the tolex and into the wood. It had a complete restoration.

1963 Ampeg B15-N Bass Amplifier
This 1963 piece of rock history was probably the most predominantly used model of bass amp for recording in the ’60’s. This one had many miles on it and needed a serious clean-up. Originally, it came in Ampeg’s “Porta-flex” configuration, meaning that it was mounted on a flat panel which flipped upside down into the speaker cabinet for storage and transport. The owner requested that the head be built into a separate enclosure. Both the head and cabinet are re-covered in 1960’s vintage Ampeg tolex and Marshall “bluesbreaker” grille cloth.

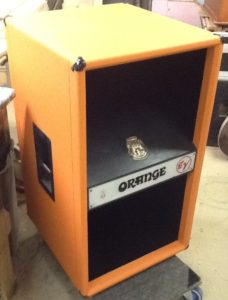
1973 Orange “Bouncer” Single 15″ folded horn Bass Cabinet
This large enclosure was built by Orange Amplification using an Electrovoice cabinet design known as “The Eliminator”. It came with an Electrovoice SRO-15″ speaker which handles a massive 60 watts. But those are very high efficiency r.m.s. watts. So it kicks some butt.
The tolex had been painted black at one time, so it has been re-covered in orange Orange tolex. The original piping, handles and corners were cleaned and re-used. And it has both original logos. This is a rare beast indeed.
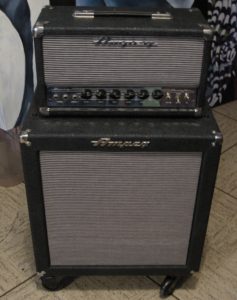
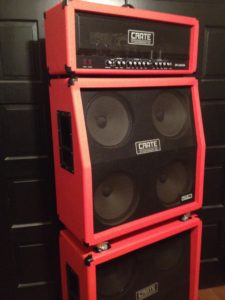
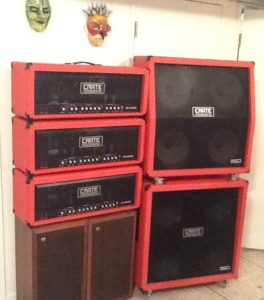
Crate Red Voodoo heads and cabinets
My client owned 3 heads and 2 – 4 x 12′, which he had purchased at different times. They were all red, but the tolex varied from very dirty to almost new, and they had all faded to varying degrees. They all got a new red covering and look pretty stunning!
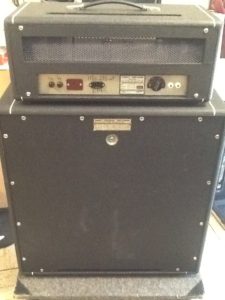
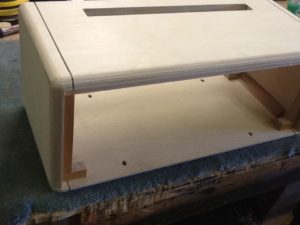
1976 HiWatt head and cabinet
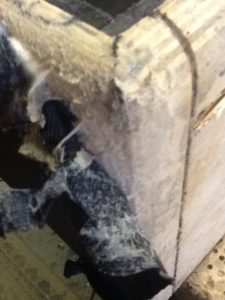
This old HiWatt rig has the distinct privilege of being the most horrific job I’ve ever done!! My client came to me with this half stack after having had it re-tolexed by another company. The job that company had done showed lack of experience and was very poorly, and in places, incorrectly done. He wanted me to re-do it for him.
They had done extremely bad tolex joins on all of the corners. There were lumps of glue under the new tolex. The piping slots had not been cleaned and the tolex at the slots was cut incorrectly and crooked, resulting in wavy white piping and exposed wood in places. Also, there was glue visible on many outer surfaces of the tolex.
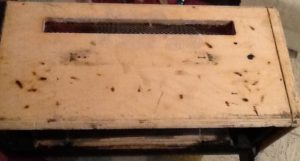
After removing the amp head and hardware from the head cabinet, my next task was to strip off the tolex. This usually takes 30 – 45 minutes. I spent over 4 hours on it, and it still wasn’t finished. Copious amounts of heat, solvents, sanding, and brute strength were no match for whatever the glue was that the first “restorer” had used. (see 4th picture). My son and I combined our strength and still were only able to pull it off about 1/8″ at a time. It resulted in sore, blistered. and exhausted fingers, aching elbows, frustration, and a cabinet that still wasn’t stripped down and had large swaths of baltic birch ripped out off the surface. After discussion with my client, it was agreed that, rather than wasting more time on what would end up being a badly damaged cabinet, I would build a replacement cabinet for the head (see 3rd picture).
I originally quoted 11 hours to do the complete job on both pieces. I had already spent over 12 hours on the head, and at 5 times the total surface area, I estimated that the speaker cabinet could potentially take 25 – 30 hours to strip it down. I could build a couple of brand new 4 x 12’s in that amount of time. Despite this, my client still wanted me to strip the speaker cabinet.. Due to unforeseen circumstances at the time of the quote, I respectfully had to decline from continuing the job as originally planned. My client was miffed, and I had just refused my first job – ever.
I was able to clean up most of the problems on the speaker cabinet without stripping it down. Cleaning excess glue and putting patches in the bad joins made the corners much more presentable. Removal of the white piping on the top and bottom allowed the proper cleaning of all the excess glue from the piping slots. This had to be done for the piping to lay flat. Additionally, the edges of the piping slots were damaged from bad tolex trimming and, as slivers of the tolex and wood had been cut away, it was necessary to hide the bare exposed wood with more patching. The piping itself had glue all over it, so it had to be replaced.
The first restorer obviously didn’t order enough tolex for the whole job and consequently had to make a join on the bottom of the cabinet. It was done horrendously, with the tolex overlapping in places and gaps between it in others. There was a large amount of excess glue on the outer surface, which took a lot of time to clean off without damaging the tolex.
The grille cloth had been installed very crookedly and it was too small to reuse it when it was aligned correctly.. It needed to be replaced. When removed, the grille frame was found to be warped and coming apart, so a new one was made. A crack in one of the plastic cabinet handles required reinforcement before it could be re-installed.
The total time invested in this job was more than double my original quote. I charged my client the original quote, which cut my labour to less than half of my usual rate. My client was still unhappy and came back to me again, wanting me to strip the speaker cabinet and re-cover it. Again, I declined.
This was definitely the most lose-lose situation I’ve ever had to deal with.
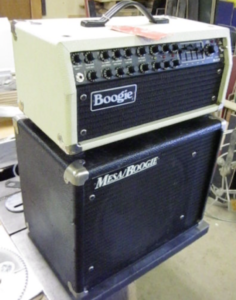
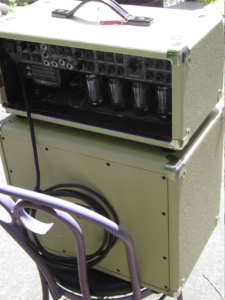
Early ’90’s Mesa Mark IV and 1 x 12″ cabinet
The owner of this Mark IV head found a vintage correct speaker cabinet which was covered in black. He asked to have it done to match the cream coloured head. Easier said than done. I requested samples from every tolex supplier I could find, but found nothing to match the head. Then, I went directly to tolex manufacturers and was lucky in finding a match. The problem there was that I needed a couple of yards and their minimum order was one 50 yard roll. After an enormous amount of begging and guilt-tripping, I was able to talk them into sending me 5 yards instead, and so the match was made.
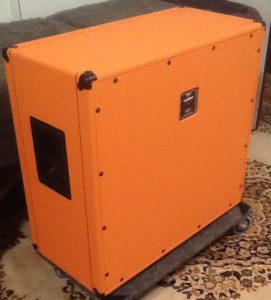
Orange PCC412 Speaker Cabinet
Although this isn’t a vintage cabinet, it was certainly in need of restoration. It all started when my client and his significant other decided to go their separate ways. Apparently, happiness didn’t prevail, and while he was at work, she became a vengeful artist with permanent markers, using every side and edge of his perfect condition Orange cabinet as her canvas. For some reason, thankfully, she didn’t draw on the grille cloth or the logo. Needless to say, it wasn’t really what my client had in mind for it. It’s all better now.